Wednesday, 14 December 2011

12 Days ‘til Christmas–Day 3

Only 9 more days until Christmas Eve and 10 more sleeps until Santa! I’m back with one of my Christmas cards for this year, which features the sledging silhouette from Welcome Christmas in a side step scene.

side_step_snowscene

I’ve used a colour scheme of Night of Navy, Bashful Blue and Whisper White. The background trees are from Lovely as a Tree and the sentiment from Curly Cute embossed using white embossing powder. I’ve finished the side panel with a few die cut snowflakes. That’s all for today, I’ve got another of this year’s Christmas cards for you tomorrow.

Tuesday, 13 December 2011

12 Days ‘til Christmas–Day 2

Morning folks! I’m back with another Christmas themed project. Today I’ve got the gift boxes which I’ve made to hold some Hotel Chocolat chocolates – yum.

christmas_chocs_11

The box is another template by Lauren Meader, which perfectly holds one of the trays of 6 chocolates. I’ve used Real Red and Wild Wasabi cardstock to make the boxes and topped them with Holly Berry Bouquet DSP.

christmas_chocs_112

The tags have been embossed using the oval designer frames embossing folder. I’ve then stamped the pine cone image from the Pines and Poinsettias stamp set onto Very Vanilla cardstock, punched it out using the extra large oval punch and layered it inside the frame. The boxes are finished with a length of Real Red satin ribbon.

I’ve got a meal out tonight with a number of my downline – I’ll have to share the gifts which I’ve made for them later in the week (assuming I get them finished in time, as I’m on a training course for the rest of today!) I’ll be back tomorrow with a Christmas card or two.

Monday, 12 December 2011

12 Days ‘til Christmas – Day 1

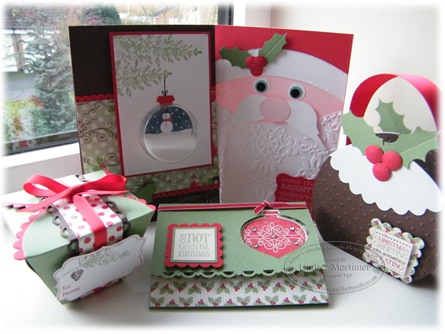
Morning all! Well here I am with the first of my projects for the 12 days ‘til Christmas. I’m not sure how we’ve got to the 12th December already, but I’ve been busy beavering away in my craft room trying to get everything ready for Christmas day. The present shopping was finished a couple of weeks ago, and I’ve been in full swing making 100 cards, 20 gift boxes plus tags and wrapping paper. So I’ll start today with the projects we made in class a couple of weeks ago, featuring the Tags ‘til Christmas stamp set. I wanted to demonstrate to the ladies that the set doesn’t just have to be used to create gift tags.
christmastags_group

We used the Holly Berry Bouquet DSP and a colour palette of Real Red, Wild Wasabi and Chocolate Chip. The first project was a Christmas Pudding treat pouch.

pudding

It’s a simple 5-sided box inside made from Chocolate Chip cardstock and sandwiched between two puddings, which were circles cut from Chocolate Chip cardstock, embossed using the polka dot embossing folder and decorated with ‘icing’ which was cut using the scalloped circle die. The holly was made using the large oval punch and 3/4” circle punch. The sentiment, taken from Tags ‘til Christmas, was coloured using markers and stamped onto Whisper White cardstock. It was then layered on to a scalloped square punched from Holly Berry Bouquet DSP. The handle is a length of Real Red satin ribbon, secured with two mini brads.
santa

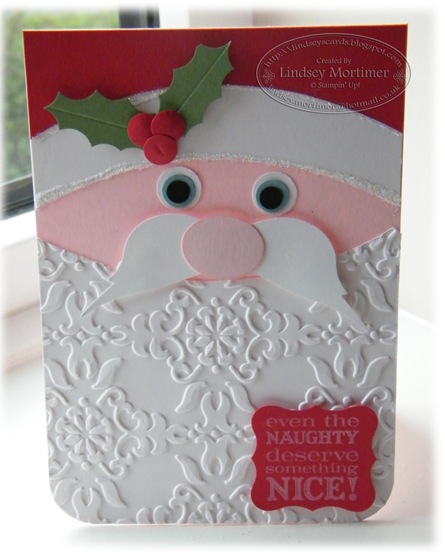
The second project was a design I found whilst browsing google images, there are a number of variants out there, but I CASEd this one from Cindy Lawrence.

The card has a blushing bride base, with a Whisper White beard embossed with the Vintage Wallpaper EF. His moustache is made using two birds from the bird builder punch.

I used a side plate as a template for the curvature of his hat. I’ve added a line of dazzling diamonds around his hat using tombow. The holly was again created using the oval and 3/4” circle punches and I completed the design with the sentiment from Tags ‘til Christmas, stamped onto Real Red cardstock using Whisper White ink and punched out using the curly label punch. The nose is punched from blushing bride cardstock using the small oval punch and his eyes punched using the various small circle punches from Whisper White, Marina Mist and Basic Black.
petal_box

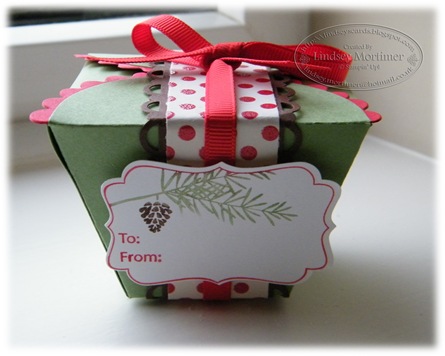
The third project was borrowed from my lovely friend Val Moody. It’s a gift box made from Wild Wasabi cardstock using the petal cone die. Decorated with a belly band made from Chocolate Chip cardstock, Holly Berry Bouquet DSP and Real Red grosgrain ribbon. The tag from Tags ‘til Christmas was coloured using markers, stamped onto Whisper White cardstock and punched using the decorative label punch, then attached to the belly band using dimensionals.

snowman_ornament

The snowman ornament card was made using the snowman tag stamp, selectively coloured using markers and then layered in a treat cup. The branch is from Lovely as a Tree, and the sentiment from Season of Joy.

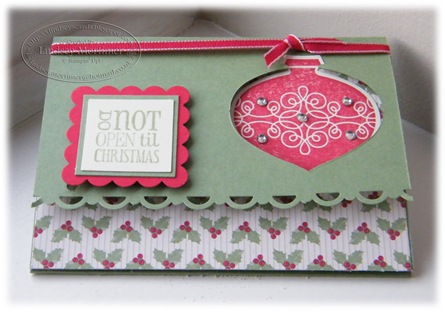
And finally the gift card holder, which is always a useful project to have on hand at this time of year! I CASEd this design by Heather Summers, and adjusted the measurements slightly for UK card stock, then adjusted the colour scheme.
gift_card

Well, that was one mammoth post! I’ll be back tomorrow with some photos of the gift boxes which I’ve been making. Until then

Sunday, 11 December 2011

Happy Birthday Pops!

Evening All! Just popping by to share the cards and present packaging which I made for my Dad’s birthday, which he celebrated today. We’re just back from a family meal, and I’m hoping he’s opened it all by now, so I’ll be safe in showing it to you all. You might spot a couple of products in here that you’re not familiar with, but more about those later! First up, here’s his card from myself and Darren.

Dad_birthday_1

I’ve used the hostess set Happiest Birthday Wishes from the 2011/12 IBC to create the decorated more mustard panel, along with a focal birthday sentiment from Delightful Dozen. I coloured the sentiment using Soft Suede, More Mustard, Pool Party and Pear Pizzazz markers, stamped onto Very Vanilla cardstock and layered onto a Pear Pizzazz oval.

I’ve used some soft suede taffeta ribbon and finally, layered it all onto some brand spanking new DSP, which will be available in the NEW MINI CATALOGUE, which launches on 4th January – be sure to contact me if you’d like a copy posting to you!

I made a coordinating gift card box using more mustard cardstock, pear pizzazz ribbon and DSP, and decorated it with the tag from Happiest Birthday Wishes. The box is a template by Lauren Meader, cut using my trusty CraftROBO, which has been taking a hammering this last week!Dad_birthday_box

My brother texted me this morning to ask me to bring along a card from him too, so I popped back into the craft room and knocked this one up, using the Petite Pennants stamp set and co-ordinating punch and the Happiest Birthday Wishes stamp set. I’ve used the Just Add Cake designer papers and used the colour scheme from those papers to create the card.

dad_birthday_2

Happy Birthday Pops! I hope you liked your cards and pressies, only a few more years and I’ll have to make one covered in BIG numbers Winking smile.

I’ll be starting my ‘12 Days to Christmas’ tomorrow – with a project a day up until the big day. Until then…

Saturday, 26 November 2011

Long time no see…Tags ‘til Christmas

Hey folks! sorry, I’ve been MIA a little again lately. Things have been somewhat hectic, and my energies have been focussed on getting ready for convention, and prepping my class for today. I’ll get some piccies of my card candy and swaps from convention over the weekend whilst I have some daylight. In the meantime i thought I'd better post something crafty, so I’m sharing some sneak peeks for class today, hopefully to whet the appetite of the class attendees! We’re using the Tags ‘til Christmas stamp set along with the Holly Berry Bouquet papers.

Sneak Peeks_Nov

I’ll be back tomorrow to show you what we made in full, and the tutorial will then be available in my sidebar. I’ve got some exciting new to come later this month, so stay tuned!!

Saturday, 12 November 2011

Happy Saturday!

hey folks, I know, twice in two days, you’ll soon be sick of the sight of me! As promised, I have piccies of another couple of cards from Christmas Club to show you, and I’m hoping for some decent daylight today to photograph the remaining 5, then I can post them tomorrow! Both cards feature the Contempo Christmas stamp set and the now retired Jolly Holiday designer papers in a reverse gatefold.

christmasclub4christmasclub5

I’m planning a day in the craft room today, after painting the front door that is, and I’ll hopefully have my next class designed so I can give you some sneaky peeks before I disappear off to Paris for convention. The next class will be my last for this year, and is on Saturday 26th November from 1-4pm, when we’ll be making a couple of cards and some useful gift packaging! If you’d like to join us, be sure to email me to reserve your place – the link is in the sidebar.

Well, back to the painting and the ink, see you soon.

Friday, 11 November 2011

only me…..

Hey folks, well I’ve finally escaped! that mountain of junk has been moved and sorted and I found the room hiding underneath it! I have a couple more bits to put away and then I’ll take some piccies to prove that I haven't just pushed it to one side of the room and ignored it.

In the meantime I’ve been a busy busy bee preparing swaps and card candy for THE event in the Stampin’ Up! year - convention, which is next week in Disneyland Paris!!!! this time next week we’ll be there, getting ready for the awards dinner. Miraculously I have finished my swaps and card candy, and my roommate gift is in hand, so I’m now feeling somewhat chilled, just wondering what I’ve forgotten to do!! I realised that I never shared any of the cards which we made in my recent ‘Christmas Club’ marathon. Over two days we made 50 cards each, 5 each of 10 designs. there were a minimum of 9 ladies on each day, which meant a heck of a lot of prep last month, believe me!! so here’s the first card, a simple design using Serene Snowflakes in a colour combination of Night of Navy, Marina Mist and Whisper White. the sentiment is heat embossed in white, and some of the snowflakes have been stamped in frost shimmer paint to add a glistening effect.

christmasclub2

The second used the Season of Joy stamp set, with the now retired Jolly Holiday DSP in a twisted easel card – the poinsettia is stamped, cut out and used to create a latch for the easel.

christmasclub1

And finally for today, a centre stair fold card in Crumb Cake, Very Vanilla and Not Quite Navy featuring Winter Post, Lovely as a Tree and Heard From the Heart stamp sets.

christmasclub3

Please excuse the lighting in the photos – would you believe that it’s practically twilight at 3pm now? I’m hoping to finish the design of my final class of the year tomorrow, which uses the Tags ‘til Christmas stamp set, so sneak peeks should follow early next week. I’ll pop back tomorrow with more of the samples from Christmas Club.

Have a fantastic evening!